Tuesday, June 7, 2016

Every Day Is A Good Day When You Build Fire Art

To paraphrase Bob Ross.  Only semi-joking.  I started a new job at Kairos Aerospace, and I'm liking it a lot.  I have an hour here or there in the evenings, and I sit down and work on a little bit of the Ico.  And, if I do even that tiny bit of art, then I've done some art.

Today's contribution to art: demonstrating that I can hack out a very reductive REST server on an Arduino using an ENC28j60 ($7 from Amazon).  I wrote a dead simple REST server that just collects the URL from a PUT request.  So, I can, for instance, PUT to /foobar to send the command "foobar".

Example:
So, yes, I'm sitting here after work programming.  Is it art?  Not in and of itself.  But am I working on art?  Who knows.  It feels good.

Monday, June 6, 2016

Automated electronic ignition

Successful test of automated electronic ignition:
This is the "demo" reel: it's just programmed to go back and forth, with the gas valve turning on and off as needed.

BIG RED WARNING
The gas tank shouldn't have been that close to the flame.  Don't do that.

Electronics are still in prototype, as in, bunches of wires hanging off breadboard.  Next step is to figure out how I'm going to have each individual unit communicate with the master.  Right now, my plan for that is to use an Ethernet-to-SPI bridge such as this one:

The idea here is that wireless is both overkill, and not super reliable at Burning Man, where they blast microwave trans-playa for DPW and Ranger comms, as I found out when I built the "Black Rock City Craigslist" project.  RS232 isn't designed for more than a few feet, and it's point-to-point, and not multipoint.  If you want long-distance (more than 25 feet), reliable, and cheap, ethernet is a great option.  Almost all of the hardware is commodity, off-the-shelf.

Also, I need a website, because I need to start putting together a build team, fundraising, etc etc.  Going to get to work on that soon as well.  Want to start looking for studio space, possibly at Box Shop, which is near my house.

Monday, May 30, 2016

Limit switches and spark ignition

Got the limit switches and the spark ignition working together.  This was a bit trickier than it sounds.  The limit switches are springs held onto the rail using a high temp epoxy.  (Photo below was from when I was testing them, before I soldered the leads on.)


When the shuttle contacts it, it closes the circuit to ground.  Running a 15 foot line causes a lot of line noise, especially from the line running next to the motor, so I added in a simple low pass filter similar to the one described here.

The spark gap igniter uses the same unit I used for the backpack poofer, which unfortunately is no longer manufactured; not sure yet what I'll replace this with (looks like you can get similar things on EBay by looking for "high voltage pulse ignition coil".  I thought I was being clever by using the chassis body as the ground for the igniter, meaning I only needed a single electrode.  And it worked!  But, as I discovered, this has other unfortunate effects:
Luckily, I have some spares lying around, and Arduinos are cheap.  So, I rebuilt this with two electrodes, held apart by high temp epoxy (I'm using this stuff a lot now, hoping it will hold up!)


And it all works together nicely.  Here's the limit switches and igniter being driven by an Arduino, with no crosstalk or interference:


Next step: add in the gas solenoid, and run the whole thing back and forth.  Also need to add some small cross strips in place on the top opening to keep the hose carrier from riding up.

Monday, May 23, 2016

Modeling

Was in Chicago this weekend for my 40th birthday, celebrating with my twin sister, the "real" artist in the family, and took some time on the plane to start getting familiar with Sketchup.  I made a few models, for future reference.  These aren't exact, but are a good template for when we have to start doing these en masse.

Here's a "cutaway" model showing the structure, rails, rail holders, and sheath:

And, for fun, I generated a rough sketch of what a pyramid with 8' sides will look like, next to a typical 5'10" Burner:

The scale is a bit disappointing, to be honest.  Even with 8' sides, at 8', the total height is still just 8'/sqrt(2) + 6" (for the offset of the corners from the ground), which is 6'1".  If we up the ante to a tetrahedron, it's a bit more formidable:

I don't have the time or patience at the moment to draw an icosahedron model.  But you get the idea.

Thursday, May 19, 2016

Epic success!

Full scale test of the sheathed production unit, huge fucking success:

I tested every piece of this pretty well, so I'm not surprised it worked.  But still, really fucking exciting.  This is basically the production version of what I want to use.  Build 7 more of these, and we'll have a pyramid.  11 more, and an octahedron.  29 more, and an icosahedron.

Here's a view without the cladding, so you can see the mechanism.

A few notes on additional features/improvements:

  • Need to make a small holding strip across the middle of both segments, to hold the hose tracker below the opening.  I don't want that coming up (as it does in this video) and ruining the effect.  Alternatively, I might just put some aluminum screen door mesh across the top.  I was considering taking a 2" strip and drilling some 1/4" holes in it, placing it about 1/2 above the opening, and seeing what that did for the flame aesthetic.  But, I don't think it will make a difference.  And I like what we've got here.
  • I think I'm going to test swapping out the pilot lights for an electric ignitor.  First, the pilot lights aren't great for the plastic hose carrier, and probably not great for the hose either.  Second, they're not as blowout proof as I was hoping.  And third, I think an electronic ignitor will actually be more cost effective and simpler.  It just requires a single wire run up through the hose carrier (the pipe itself is ground) and the ignitor itself I think cost me $5 or something.
  • Need to install limit switches at the ends of the rails, so the controller knows when they've hit the end.  I may want to have some sort of positional feedback, to ensure that these track at the same rate, but we can look into that after building a few to see how big a deal that is.  Maybe just a simple IR detector, through a hole in the end, can give us a rough idea of how close it is, since it's going to be hot as hell.
  • And, of course, we'll need some end covers eventually.  But those are easy to make from the steel sheet.
Working on the limit switches and ignitor next.

Tuesday, May 17, 2016

Build notes: Sheet metal working, and pilot lights

I've had a 4x8' sheet of 22ga steel sitting in my garage (leaned up against my hexayurt) for probably about six months now, since starting Mocobe really.  So, it felt good to finally drop it in the back of my pickup truck and haul it over to the shop to start making the sheath for the linear drive unit.  (22ga was the thinnest I could find locally that wasn't galvanized; I was shooting for 25ga, but it wasn't available.)

First things first, I took the rail holders that I had bolted on with some difficulty, and welded them in place.  I can't remember why I thought that bolting them would be necessary; I think I was under the impression that they might need some lateral play, in order to make sure the rails slid on properly at both ends, since they're separated by 8 feet.  That is certainly not the case, the rails fit on fine with the holders welded in place more-or-less-straight.

I also cut a couple of segments of 3/8" pipe (same pipe I was using for bolting together the two 4' segments) and welded on a couple of holders for 1/8" copper refrigeration pipe, to use for pilot lights.  Some photos of the pilot lights below.


These are hooked up to a 1/2 PSI regulator, and have 1/16" holes in them, but they still need a needle valve to dial back the flow rate a lot.  I wrapped these in a small amount of steel wool, but I found that it wasn't effective at preventing simulated blowouts, so I might need more.

Now: On to the fun stuff!

Cutting the sheet metal was a bit of a pain.  There are a lot of options here, but few good ones:

  • Band saw: too unwieldy for a piece this large, and too hard to make straight cuts
  • Plasma torch: Excellent!  Except that TechShop doesn't have one anymore.  They did years ago, but it broke and they never replaced it.
  • Oxy acetylene torch: Too messy for something this thin.  And I don't remember how to use it.
  • Water jet: Too expensive for a simple straight cut.
I decided in the end to go old school, and used an angle grinder.  Simple, reliable, and hard to screw up.  I tried a few things, with different cuts, and found that I could make a decent straight cut free-hand, but that using a guide made it a lot easier.  I found a 1.5' piece of steel scrap with a 1/2" 90 degree bend in it that was perfect, and if I keep doing it this way, I'll probably make a longer one.  But, ideally, I'd like to do this with a plasma cutter in the future.  You can use it with an aluminum guide and make quick work of it.


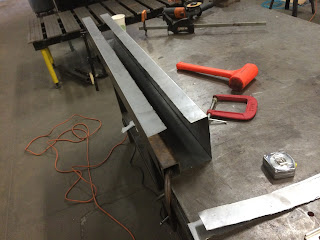
The layout for the sheath was to take a 4' long sheet, and bend it into the sheath of the correct shape, leaving a gap on top for the flame to exit.  Here's the plan:


I can use the finger brake for the first two bends easily.  After bend 2, I leave it in the brake, and make the third bend, on the first 6" segment.  The finger brake only opens about 3/4 of an inch, and after the third bend, it's got 6" vertical behind it, but I can work it out with a bit of effort by pivoting the piece.  But I definitely can't make the last bend this way, as getting it out of the brake would be too difficult.  So, time to go old-school:


The fit isn't perfect, but it's good enough.  I went about drilling some holes and tapping them to hold the sheath in place, and a) spent way too much time using the drill press when a hand drill was just as effective, and b) broke a 6-32 tap.  I have broken several 6-32 taps already on this piece, and I was thinking about why this might be, and came to a realization:

I originally started using the 6-32 tap because, for a particular piece (maybe the stupid rail holders?) I needed as small a bolt as I could reasonably use.  I dumped a bunch of 6-32 bolts into my tool box at some point, and thereafter I just kind of defaulted to using the 6-32 tap for everything.  But, this was incredibly stupid: the 6-32 tap breaks most easily because it's the smallest tap.  I did the second sheath with the 8-32 tap, and it was like butter.  It took me about 50% longer to drill the holes, but less than half the time to tap them, and the tap was way more stable.  So, advice: don't use the 6-32 tap on steel if you don't need to.

Next up: putting it all together.  I'm starting a new job soon, and am hoping to get this prototype done before then, so the next couple of weeks are Flaming Icosahedron time.  Stay tuned.