Saturday, August 29, 2015

Rotary mechanical prototype v3ish: FAILZ0R

My last rotational valving prototype showed some promise, so I decided to try a modification, with a third sheath that had a linear set of openings, so that there would be three layers:

These fit together Russian-nesting-doll style.  There's about a 1" gap between the inner and the middle, so the flame will stay alight, and the inner and outer have only about 1/16" between them, to act as the gate.  I also spent some time making a nice bracket for holding the inner pipe in place without requiring bolts, so that the outer pipe could be flush with the inner pipe.  It slides inside the middle pipe and was welded in place.  Required me to resurrect some sheet metal working skills.


The results of the test were, well, not good:

You do again see some modulation of the flame, but it's a small effect.  My impression is that the double-gating is making it such that no air is reaching the actual gas outlet at the inner tube, and we're only getting ignition as the gas escapes into the "atmosphere."  One problem with building smaller-scale prototypes and scaling them up is that you see these kinds of problems: air flow and gas flow is much worse.  I considered running an air line into the inner tube, and pumping air into it.  That said, I'm not certain that this design is a good idea overall, and I'm going to take a break from it.  The machining is fun, but it's not proving very useful.

I have some work to do on trying to improve the multiplexing prototype, but I'm less bullish on that at the moment as well given the problems.  I've been avoiding this for a while, but I think a much simpler concept might give me a much better aesthetic impression, which is basically just a small pipe that mechanically runs back and forth inside a larger pipe, like a shuttle, carrying a tube along with it, and simply carrying the flame, physically, that way:

I want to use Viton tubing to carry the gas to the shuttle, it's good to 400F, and it's resistant to propane.  But fire art safety might disagree; they seem pretty set on the idea that you can only use manufactured LP hose.  I don't think it's impossible, with a 4" diameter tube, to use manufactured hose.  It might be a future discussion if this design turns out to be good.  Having spent a lot of time working on this, I'm feeling more confident in my thoughts about safety and maybe straying outside the bounds of what is specifically published.  Including something like an excess flow check valve might help, though it might also be prohibitively expensive.

Leaving for the burn on Monday.  No more fire art for this week probably, except for running around with my backpack on.  Come find me at Playasos at 8:45 and B if you're there, and say hi.

Thursday, August 20, 2015

Experiments with flame colorants

I don't think I'll have it ready in time for the burn, but I wanted to try working with flame colorants for The Widowmaker.  Here are some experiments with solid and liquid copper sulfate. I did some experiments with boric acid as well, but those didn't turn out as well.  The key I discovered was to make a saturated solution, then use a very shallow vessle to hold it with a very small hole in the bottom; in this case, I just inverted a 1/2" end cap which had a 1/16" hole in it on top of a pipe, and held it in place with rescue tape.
The results were nice, but the gas blew most of it out.  Spraying it directly into the flame might be workable, but the timing would have to be just right, and I wonder if I can get enough volume.  I don't have a spray bottle sitting around that I want to ruin with copper sulfate just now, so it will wait a bit until I get one from The Jerk Store.

Wednesday, August 19, 2015

Multiplexing scale prototype

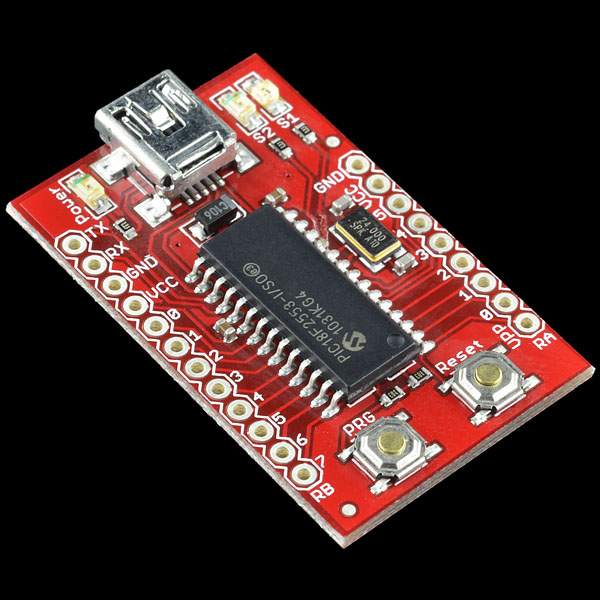
Built a larger scale prototype of the multiplexing concept.  For control, I tried something new, using the USB Bit Whacker:
Instead of using a microcontroller, you can bit twiddle this in Java (or in Groovy, in my case) using simple serial port commands.    I used JSSC for the serial port communication because javax.comm is way too complicated, and as far as I can tell is not part of the JDK or hosted on Maven Central.  (If it's not on Maven Central, I don't need it.)  The main reason for trying the Bit Whacker was that, when using the Arduino, the compile-upload-run cycle is long, and getting feedback (button presses, whatever) into the system is non-trivial.  The Bit Whacker lets me iterate on variables and protocols much more quickly.  Also, I can do things like start it up, open a valve, put it in an idle state waiting for keyboard input while I light the flame, and then hit a button to continue the program.  I can do this really easily, whereas with the Arduino it requires actually attaching a button and reading input from it.

I placed 6" lengths of 1/16 inch holes at six inch spacings, with 3 strands with 3" overlaps.  I re-used the valve array plumbing from the electromechanical prototype.  Here are some test videos at two different flow rates:


The lighting makes it hard to see what's going on, but there are two main problems:  First, because there are holes all along the length, the gas pressure at the distal end is much lower than at the proximal end.  This is especially apparent in the first video.  This is easily fixable by creating a loop of the tube and plugging both ends into a t-junction, but it's more plumbing, and a pain in the ass.

Second, in the second video, you can see that the first segment ignites, then the second segment, in sequence, and the first goes out (mostly.)  Then the second ignites the third.  At this point, the first segment comes on again, and should ignite the next length of the first segment.  The problem is that the original position flares back up, and we get two flame fronts.  Why?  Because the flame never actually goes out; when I shut down the gas flow to the first segment, there's still residual propane in the pipe, and it doesn't burn off or go out immediately.  It just goes to a very low flame.  This can persist for minutes at a time.  If I want to continue with this prototype, I'll need to figure out a way to deal with this.  It's not a failure, but there are bugs to be worked out.  Every bug fix introduces new complexity, and the goal is to make the design as simple as possible, but no simpler.

Also notable about this run was that it was the first time I had to use my fire extinguisher.  The solenoid valves are poor quality (I guess that's what you get from $9 a valve on Alibaba) and there was some leakage from one of the unused valves that's supposed to remain closed when unenergized.  I was trying to work around it so I could do a quick and dirty test, but it caught fire, and wouldn't go out because of the volume of gas leaking.  I decided to extinguish it for safety, since it was close to a few things that I didn't want to catch on fire.  Safety third!  (A friend of mine told me once that they saw a t-shirt that said:

1) Porn
2) Bacon
3) Safety

But I can't find it on the intarwebz.  Would be fun to have.  Suppose I could make one.)

Sunday, August 16, 2015

Successful test of the fire poofer backpack

Bad video quality, but it worked.  I'm probably going to replace the PVC with copper, since the top did stay on fire a bit after the initial poof, and it did char the top of the PVC.  But otherwise, total success.

I'm thinking this thing needs a name, I'm thinking of just calling it The Widowmaker.  But I'm open to suggestions.

Friday, August 14, 2015

Making a Thing (with Metal)

I quit my job a couple of weeks ago.  I was bored, and I wanted to do something else.  And I'm kind of looking around.  But in the meantime, I'm working on fire art more, prepping for the burn, and going fishing.  Today, I Made a Thing™.

When I was young, and I wanted to make something, I was always baffled by how you went from an idea to a thing.  In my mind, I guess, I didn't really think there was anything you could do between woodworking and drop forged steel; if you wanted a thing, and it wasn't made of wood, you were pretty much out of luck unless you wanted 10,000 of them.  I don't think I thought it explicitly, but I think it was pretty much how I figured the world was.  Only professionals could Make a Thing™.

Doing a bachelors and a doctorate in physics, you're highly encouraged to take machine shop.  There are a lot of simple situations where you have a sensor, and something you want to attach it to, for instance, and they don't fit.  So you machine an adapter plate.  I was instantly in love with machining, and would often find excuses to go to the machine shop to make things*, especially in grad school.

Since then, a lot of things have changed that made it easier to Make a Thing.  For one thing, Make magazine, Instructables, and the entire maker/DIY movement have made it much easier to learn how to make things, especially if you came from a family that did not make things (my father is a lawyer, and is a great lawyer, but was never much with hand tools.  We did build a passable treehouse together, though.  That was a great memory.)

For another, there are a lot of ways to make things that didn't exist back then.  There are low temperature moldable plastics, 3D printing (even in metal!), and all kinds of CNC that never existed.  The flowjet at TechShop is one of my favorites, especially for making signs:


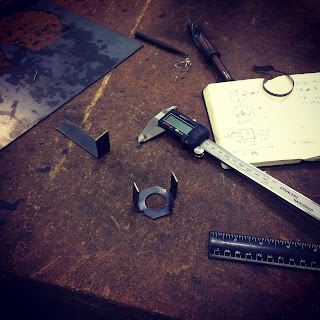
But for me, personally, having a house, and having tools, and knowing how to use them was really the biggest step, in some sense.  It's just wonderful to me that I can Make a Thing, in my own house, in a few minutes, and even simple things give me great pleasure.  As part of my backpack flame poofer (almost completed), I made a bomb-style thumb button, and wanted to have a clip to clip it to the backpack strap.  So I grabbed a piece of 16 gauge steel, bent it around the handle, cut off the end with a dremel, shaped it a bit, and drilled a couple of holes in the back to mount it:


\
The way it snaps into the holder gives me great pleasure.  I Made a Thing, and it does its job very well.

*This was way back in the very earliest days of Make magazine, and I was super excited that there was a web site just for showing off stupid stuff that you made.  Unfortunately, the original site is now lost down the memory hole, but it's not hard to imagine what we did.

Wednesday, August 5, 2015

Notes on tasering oneself

Been working a bit on the backpack poofer in the lead up to the burn, the electronics of which have been surprisingly hairy.  Turns out, dealing with two high power loads (electric ignitor and valve both take 3A) at different voltages (5V and 12V respectively) is a bit trickier than I thought.  A few interesting notes:


  • Was getting frustrating hard-to-reproduce failures of the microcontroller after actuating the spark gap ignitor.  Turns out that sucker puts out a LOT of electromagnetic interference.  It was mounted near the Arduino.  At the advice of a friend, I moved the ignitor up to the top of the gas exhaust, and ran the 5V line up to it, instead of running the high voltage from the backpack all the way to the top.  This got rid of the problems, by creating a much shorter line, and separating the ignitor, which was probably putting out a lot of juice.  Working with digital electronics gives you the false impression of modularity.  Analog high power electronics puncture that balloon quickly.
  • The ignitor is very high voltage at up to 3A.  Because the microcontroller was acting up intermittently, I thought it was off when I unplugged the ignitor and had both of the (insulated) ends of the plugs in my hands when it suddenly actuated.  I thereby became the spark gap.  I was dropped to the floor cursing and screaming bloody murder, but there was no permanent damage.  Fun with electricity!

Tuesday, August 4, 2015

Multiplexing prototype

Had a new idea when I was on a run yesterday.  It's nice to be at a point where I can test out this stuff without much expenditure because I've already acquired so much scrap and spare parts that I can throw it together quickly.  Here's a way to possibly multiplex two or three valves to get higher resolution travel:

These are two lengths of 1/8" copper tube with 4" lengths of 1/16" holes at 1/4" spacing.  They're fed from the same line, there's no valve, but it's set up in such a way that I can adjust the spacing in between them.  With a 4" separation between the two, we get immediate ignition of both:

But with a 5.5" separation, the second set remains unignited, even after the first is ignited:


What this means is that, with only three valves, I can cause the flame to travel by leaving gaps and sequentially turning them on, and still get 3" resolution by actuating them in sequence, repeatedly:


Of course, one problem is that the ignition distance and speed is going to depend a lot on the airflow around the unit.  If we try to hide the mechanics here by putting it inside a 1/2" pipe with 1/16" holes at 1/2" spacings (which I just pulled out of the last rotary prototype and slid over it):
The effect is quite nice, however, of the bar "catching fire" as the flame travels, almost what I want, but in this case the flame doesn't "turn off" behind the front, giving us just a single moving front, not a flame "quantum".  However, it makes it clear that encasing this to protect it from the wind will be tricky.  If I can get a three-fold multiplexed design to work in the lab, I'd like to try encasing it in a 2" or 3" tube, where I cut large spacings out of the sides of the tube, and possibly line it with a fine metal mesh.  If we want to be cool about it, we can cut different shapes into the sides, possibly using the flow jet.  This will maybe let the gas diffuse away, so we don't get instant ignition, but give it some wind protection, and give the effect of the flame being "encased".